元件
元件代表 Preact 中的基本建構單元。它們是從小建構單元輕鬆建構複雜 UI 的基礎。它們也負責將狀態附加到我們的渲染輸出。
Preact 中有兩種元件,我們將在本指南中討論。
函式元件
函數元件是純粹函數,接收 `props` 作為第一個參數。函數名稱**必須**以大寫字母開頭,才能在 JSX 中運作。
function MyComponent(props) {
  return <div>My name is {props.name}.</div>;
}

// Usage
const App = <MyComponent name="John Doe" />;

// Renders: <div>My name is John Doe.</div>
render(App, document.body);請注意,在較早的版本中,它們被稱為
"無狀態元件"。這在使用 hooks-addon 時不再成立。
類別元件
類別元件可以有狀態和生命週期方法。後者是特殊方法,當元件附加到 DOM 或被銷毀時,會被呼叫。
這裡有一個簡單的類別元件,稱為 <Clock>,用來顯示目前時間
class Clock extends Component {

  constructor() {
    super();
    this.state = { time: Date.now() };
  }

  // Lifecycle: Called whenever our component is created
  componentDidMount() {
    // update time every second
    this.timer = setInterval(() => {
      this.setState({ time: Date.now() });
    }, 1000);
  }

  // Lifecycle: Called just before our component will be destroyed
  componentWillUnmount() {
    // stop when not renderable
    clearInterval(this.timer);
  }

  render() {
    let time = new Date(this.state.time).toLocaleTimeString();
    return <span>{time}</span>;
  }
}
生命週期方法
為了讓時鐘每秒更新時間,我們需要知道 <Clock> 何時掛載到 DOM。如果你使用過 HTML5 自訂元素,這類似於 attachedCallback 和 detachedCallback 生命週期方法。如果元件定義了以下生命週期方法,Preact 會呼叫這些方法
| 生命週期方法 | 何時呼叫 |
|---|---|
componentWillMount() | (已棄用) 在元件掛載到 DOM 之前 |
componentDidMount() | 在元件掛載到 DOM 之後 |
componentWillUnmount() | 在從 DOM 中移除之前 |
componentWillReceiveProps(nextProps, nextContext) | 在接受新 props 之前(已棄用) |
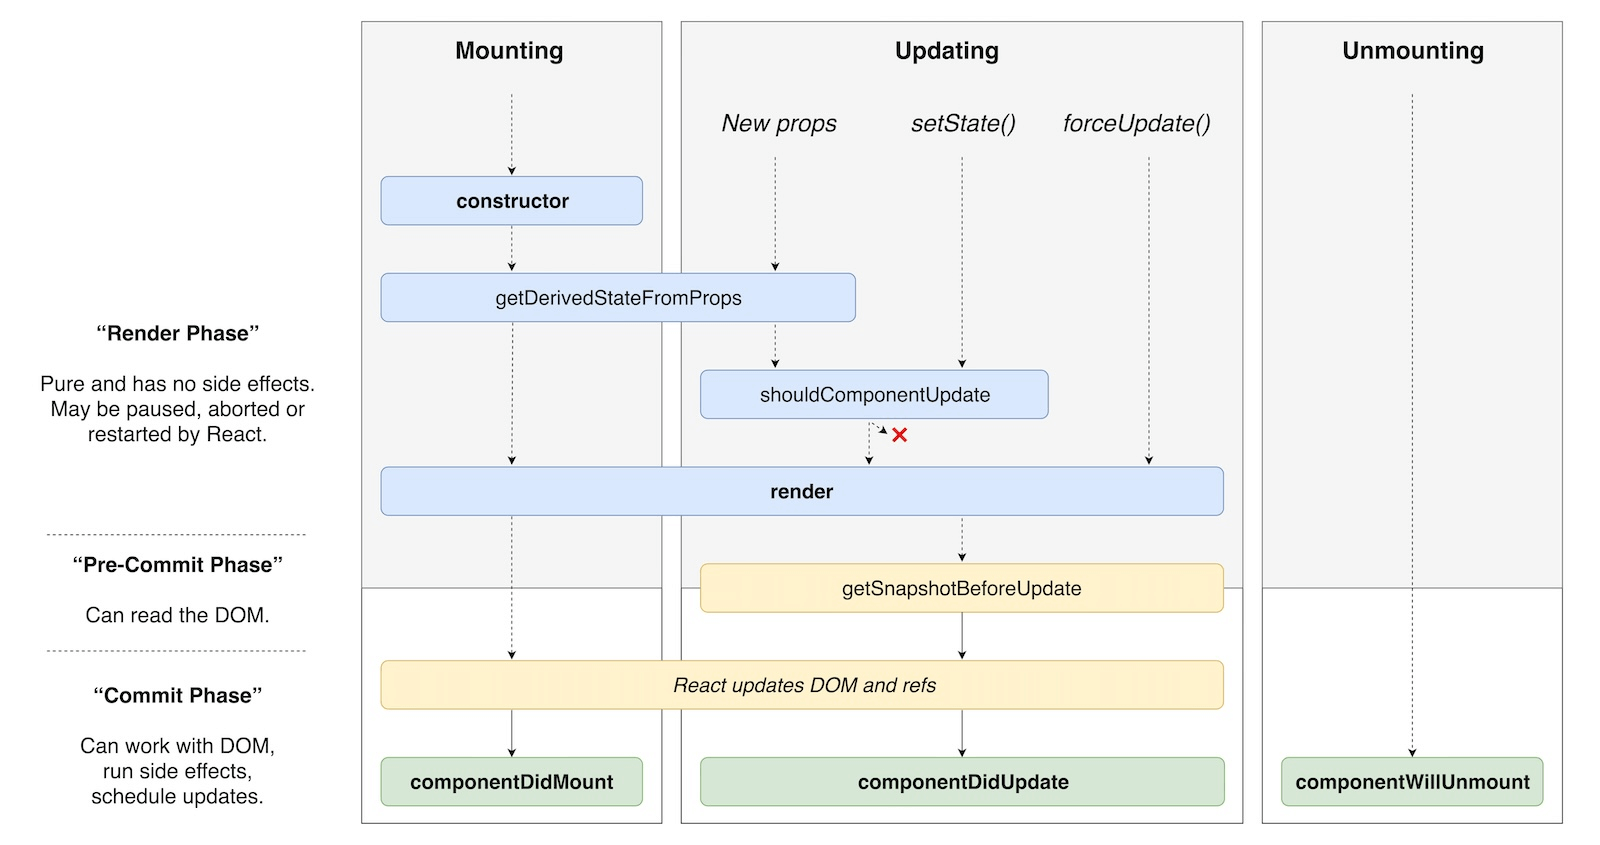
getDerivedStateFromProps(nextProps, prevState) | 在 shouldComponentUpdate 之前。傳回物件以更新狀態,或傳回 null 以略過更新。請小心使用。 |
shouldComponentUpdate(nextProps, nextState, nextContext) | 在 render() 之前。傳回 false 以略過渲染 |
componentWillUpdate(nextProps, nextState, nextContext) | 在 render() 之前(已棄用) |
getSnapshotBeforeUpdate(prevProps, prevState) | 在 render() 之前呼叫。傳回值會傳遞給 componentDidUpdate。 |
componentDidUpdate(prevProps, prevState, snapshot) | 在 render() 之後 |
以下是它們之間關係的視覺概觀(最初由 Dan Abramov 在 推文中發布)
錯誤邊界
錯誤邊界是一個元件,它實作了 componentDidCatch() 或靜態方法 getDerivedStateFromError()(或兩者)。這些是特殊方法,允許您捕捉在渲染期間發生的任何錯誤,通常用於提供更友善的錯誤訊息或其他備用內容,並儲存資訊以供記錄用途。請務必注意,錯誤邊界無法捕捉所有錯誤,而事件處理常式或非同步程式碼(例如 fetch() 呼叫)中引發的錯誤需要另外處理。
當捕捉到錯誤時,我們可以使用這些方法來對任何錯誤做出反應,並顯示友善的錯誤訊息或任何其他備用內容。
class ErrorBoundary extends Component {
  constructor() {
    super();
    this.state = { errored: false };
  }

  static getDerivedStateFromError(error) {
    return { errored: true };
  }

  componentDidCatch(error, errorInfo) {
    errorReportingService(error, errorInfo);
  }

  render(props, state) {
    if (state.errored) {
      return <p>Something went badly wrong</p>;
    }
    return props.children;
  }
}
片段
Fragment 允許您一次傳回多個元素。它們解決了 JSX 的限制,其中每個「區塊」都必須有一個單一的根元素。您通常會在清單、表格或 CSS flexbox 中遇到它們,其中任何中間元素都會影響樣式。
import { Fragment, render } from 'preact';

function TodoItems() {
  return (
    <Fragment>
      <li>A</li>
      <li>B</li>
      <li>C</li>
    </Fragment>
  )
}

const App = (
  <ul>
    <TodoItems />
    <li>D</li>
  </ul>
);

render(App, container);
// Renders:
// <ul>
//   <li>A</li>
//   <li>B</li>
//   <li>C</li>
//   <li>D</li>
// </ul>請注意,大多數現代轉譯器允許您使用較短的 Fragments 語法。較短的語法更為常見,也是您通常會遇到的語法。
// This:
const Foo = <Fragment>foo</Fragment>;
// ...is the same as this:
const Bar = <>foo</>;
您也可以從元件傳回陣列
function Columns() {
  return [
    <td>Hello</td>,
    <td>World</td>
  ];
}
如果您在迴圈中建立 Fragments,請別忘了加入鍵
function Glossary(props) {
  return (
    <dl>
      {props.items.map(item => (
        // Without a key, Preact has to guess which elements have
        // changed when re-rendering.
        <Fragment key={item.id}>
          <dt>{item.term}</dt>
          <dd>{item.description}</dd>
        </Fragment>
      ))}
    </dl>
  );
}